
Strawberry Shortcake Cheesecake: A Layered Dream of Creamy, Crunchy, and Berry Bliss
Vanilla cookie crumbs, strawberry cake, rich cheesecake, and cream cheese frosting—this dessert is pure celebration
Introduction: A Dessert That Steals the Show
If you’ve ever wished strawberry shortcake and cheesecake could merge into one glorious dessert, this Strawberry Shortcake Cheesecake is your dream come true. With layers of moist strawberry cake, creamy vanilla cheesecake, and a crunchy cookie crumb topping, it’s a bakery-worthy masterpiece that’s surprisingly achievable at home.
Perfect for birthdays, holidays, or any time you want to wow a crowd, this cake is as beautiful as it is delicious. The strawberry flavor is bold and nostalgic, the cheesecake is silky and rich, and the frosting ties it all together with a creamy finish.
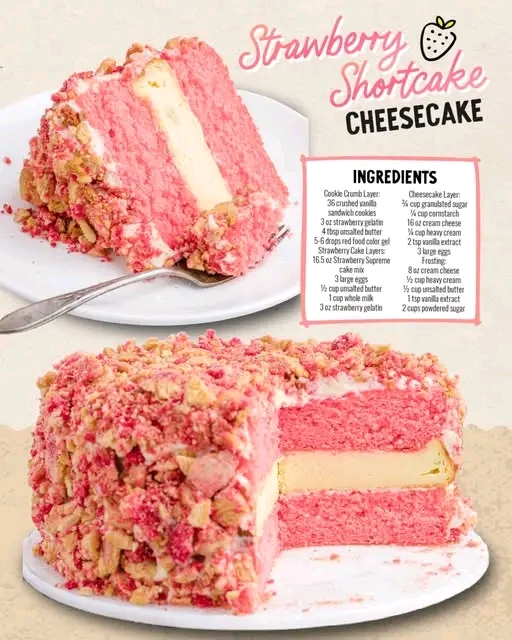
Ingredients Breakdown
Let’s take a closer look at each layer of this stunning dessert:
Cookie Crumb Layer:
- Vanilla sandwich cookies (36, coarsely crushed)
Forms the crunchy topping—use a food processor or crush in a bag. - Strawberry gelatin mix (3 oz box)
Adds color and flavor to the crumbs. - Unsalted butter (4 tbsp, melted)
Helps bind the crumbs and adds richness. - Red food color gel (5–6 drops)
Enhances the strawberry hue—optional but visually striking.
Tip: Mix half the crumbs with gelatin and color for pink, and leave half plain for contrast.
Strawberry Cake Layers:
- Strawberry Supreme cake mix (16.5 oz box)
A shortcut that delivers consistent flavor and texture. - Eggs (3 large, room temperature)
Provide structure and richness. - Unsalted butter (½ cup, melted)
Adds moisture and flavor. - Whole milk (1 cup)
Enhances richness and tenderness. - Strawberry gelatin mix (3 oz box)
Intensifies strawberry flavor and color.
Optional: Add chopped strawberries or strawberry extract for extra punch.
Cheesecake Layer:
- Granulated sugar (¾ cup)
Sweetens the cheesecake. - Cornstarch (¼ cup)
Helps thicken and stabilize the filling. - Cream cheese (16 oz, softened)
The star of the layer—use full-fat for best texture. - Heavy cream (¼ cup)
Adds silkiness and richness. - Vanilla extract (2 tsp)
Adds warmth and depth. - Eggs (3 large, room temperature)
Bind the filling and create a smooth texture.
Tip: Beat gently to avoid incorporating too much air.
Cream Cheese Frosting:
- Cream cheese (8 oz, softened)
Adds tangy richness. - Heavy cream (½ cup)
Whips into a light, fluffy texture. - Unsalted butter (½ cup, softened)
Adds creaminess and helps the frosting set. - Vanilla extract (1 tsp)
Enhances flavor. - Powdered sugar (2 cups)
Sweetens and thickens—adjust for desired consistency.
Optional: Add a pinch of salt or strawberry extract.
Step-by-Step Instructions
Step 1: Make the Cookie Crumb Layer
Crush vanilla sandwich cookies.
Divide into two bowls.
In one bowl:
- Mix with strawberry gelatin, melted butter, and red food coloring.
In the other bowl:
- Mix with melted butter only.
Set aside to use as topping and garnish.
Tip: Spread on a baking sheet and toast lightly for extra crunch.
Step 2: Bake the Strawberry Cake Layers
Preheat oven to 350°F (175°C).
Grease and flour two 8-inch round cake pans.
In a large bowl:
- Combine cake mix, eggs, melted butter, milk, and strawberry gelatin.
Mix until smooth.
Divide batter evenly between pans.
Bake for 25–30 minutes, until a toothpick comes out clean.
Cool completely on wire racks.
Step 3: Bake the Cheesecake Layer
Preheat oven to 325°F (160°C).
Line an 8-inch springform pan with parchment paper.
In a mixing bowl:
- Beat cream cheese, sugar, and cornstarch until smooth.
Add heavy cream and vanilla.
Mix in eggs one at a time.
Pour into prepared pan.
Bake for 45–50 minutes, until center is set but slightly jiggly.
Cool completely, then chill for at least 4 hours or overnight.
Tip: Use a water bath for even baking and no cracks.
Step 4: Make the Frosting
In a bowl:
- Beat cream cheese and butter until smooth.
Add vanilla and powdered sugar.
Whip in heavy cream until light and fluffy.
Chill until ready to use.
Optional: Add pink food coloring for a strawberry hue.
Step 5: Assemble the Cake
Place one strawberry cake layer on serving plate.
Spread a thin layer of frosting.
Add cheesecake layer and top with second strawberry cake.
Frost top and sides with cream cheese frosting.
Press cookie crumbs onto sides and top.
Decorate with:
- Swirls of frosting
- Fresh strawberries
- Extra cookie crumbs
Presentation Tip: Chill for 30 minutes before slicing for clean cuts.
Serving Suggestions
Perfect for:
- Birthdays
- Valentine’s Day
- Summer parties
- Dessert tables
Pair with:
- Strawberry lemonade
- Sparkling rosé
- Vanilla ice cream
- Espresso
Yields:
- About 12–14 slices
Tip: Slice with a warm knife and wipe between cuts.
Variations to Try
Want to make it your own? Try these delicious twists:
Chocolate Strawberry
Use chocolate cake layers and drizzle with ganache.
Lemon Berry
Swap strawberry cake for lemon and add blueberries.
Vegan Version
Use plant-based cake mix, cream cheese, and egg substitute.
Coconut Strawberry
Add shredded coconut to the frosting and topping.
Storage and Make-Ahead Tips
- Make-Ahead: Bake layers up to 2 days in advance.
- Refrigerate: Store assembled cake in airtight container for up to 5 days.
- Freeze: Freeze unfrosted layers for up to 1 month. Thaw and assemble fresh.
Tip: Store leftovers covered to prevent drying out.
Nutrition Notes (Per Slice, ~1 of 14)
- Calories: ~480
- Protein: ~6g
- Carbohydrates: ~52g
- Fat: ~28g
- Sugar: ~38g
- Sodium: ~320mg
- Fiber: ~1g
This cake is:
- Rich and indulgent
- Perfect for celebrations
- A showstopper centerpiece
- Easy to customize
Final Thoughts
This Strawberry Shortcake Cheesecake is more than just dessert—it’s a celebration of flavor, texture, and joy. Whether you’re baking it for a party or just because, it’s guaranteed to impress and delight.