
The Ultimate No-Bake Chocolate Easter Treat
When it comes to festive desserts that combine simplicity, speed, and irresistible flavor, Choco-Crunch Easter Nests stand in a league of their own. These no-bake chocolate nests deliver everything we want in a holiday dessert: rich chocolate flavor, satisfying crunch, adorable presentation, and effortless preparation. With just a handful of ingredients and 10 minutes of active time, we can create a show-stopping Easter treat that looks bakery-perfect without ever turning on the oven.
Below, we present the definitive guide to making No-Bake Chocolate Easter Nests that are perfectly textured, beautifully shaped, and guaranteed to impress.
Why No-Bake Chocolate Easter Nests Are the Perfect Holiday Dessert
We choose no-bake desserts for their convenience, reliability, and speed, and these chocolate nests exceed expectations. They require:
- Zero oven time
- Minimal ingredients
- One saucepan or microwave-safe bowl
- No complicated techniques
The result is a crunchy, chocolatey Easter treat that holds its shape, sets beautifully, and stays fresh for days. Their nest-like design paired with pastel candy eggs creates an instantly recognizable Easter dessert that appeals to both children and adults.
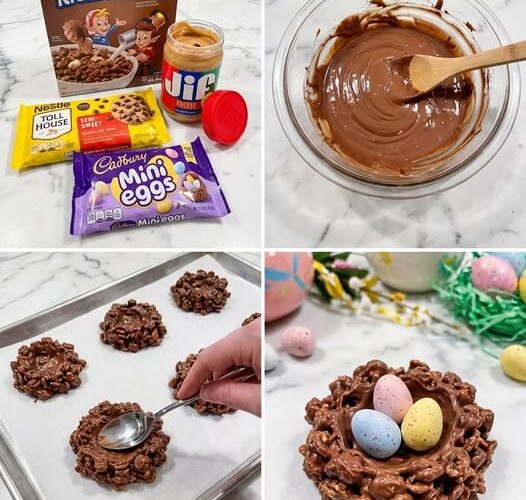
Ingredients for the Best Choco-Crunch Easter Nests
To achieve the ideal balance of creaminess and crunch, we use high-quality, simple ingredients:
- 2 cups semi-sweet chocolate chips
- 1 cup creamy peanut butter
- 3 cups crispy cocoa rice cereal
- Pastel candy-coated chocolate eggs
- Parchment paper for shaping
Ingredient Notes for Superior Results
- Semi-sweet chocolate chips provide depth and prevent excessive sweetness.
- Creamy peanut butter ensures a smooth melt and helps bind the cereal.
- Cocoa rice cereal adds the signature crunch and structure.
- Pastel candy eggs complete the Easter nest appearance.
For variations, we can substitute dark chocolate for a richer flavor or use white chocolate for a spring-inspired twist.
Step-by-Step Guide to Making No-Bake Chocolate Nests
Step 1: Melt the Chocolate and Peanut Butter
In a heat-safe bowl or saucepan over low heat, we combine the chocolate chips and peanut butter. Stir continuously until the mixture becomes silky smooth and fully blended. Avoid overheating to prevent the chocolate from seizing.
The texture should be glossy and thick but pourable.
Step 2: Fold in the Crispy Cereal
Once melted, we gently stir in the cocoa rice cereal. Every piece should be coated evenly with the chocolate mixture. The cereal provides structure, so thorough mixing ensures strong, well-formed nests.
Step 3: Shape the Easter Nests
Using a spoon or cookie scoop, we portion the mixture onto parchment-lined trays. Immediately after scooping, we use the back of the spoon to press a shallow indentation in the center of each mound to create the nest shape.
Work quickly while the mixture remains pliable.
Step 4: Decorate with Candy Eggs
Place 2–3 pastel candy eggs into the center of each nest. Press gently so they adhere securely.
Step 5: Chill Until Set
Refrigerate for 20–30 minutes, or until fully firm. Once set, the nests should hold their shape and feel solid to the touch.
The Secret to Perfect Texture and Structure
Achieving the ideal crunch-to-chocolate ratio is essential. Too much cereal results in crumbly nests; too little leads to overly dense clusters. The proportions above create a balanced, structured nest with crisp bite and creamy richness.
For best results:
- Stir cereal gently to prevent crushing.
- Shape nests immediately after mixing.
- Chill promptly for quick setting.
Creative Variations for Choco-Crunch Easter Nests
We can easily customize this base recipe for exciting variations:
White Chocolate Easter Nests
Replace semi-sweet chocolate with white chocolate chips for a softer, sweeter profile.
Dark Chocolate Crunch Nests
Use 70% dark chocolate for a more intense cocoa flavor.
Nut-Free Version
Substitute peanut butter with sunflower seed butter to make the recipe school-friendly.
Coconut Easter Nests
Add ½ cup toasted shredded coconut for additional texture and flavor complexity.
Mini Nest Bites
Use a mini muffin tin lined with parchment circles for uniform, bite-sized nests.
How to Store and Preserve Chocolate Easter Nests
Proper storage ensures freshness and optimal texture.
- Store in an airtight container.
- Keep refrigerated for up to 5 days.
- Allow to sit at room temperature for 5–10 minutes before serving for the best texture.
For longer storage, freeze for up to one month and thaw in the refrigerator.
Serving Ideas for Easter Celebrations
These No-Bake Chocolate Easter Nests are ideal for:
- Easter brunch dessert tables
- Spring bake sales
- Classroom celebrations
- Holiday gift boxes
- Party favors
Arrange them on a white platter with decorative grass for a visually striking centerpiece.
Common Mistakes to Avoid
To ensure flawless results every time, we avoid the following errors:
- Overheating chocolate – causes grainy texture.
- Skipping parchment paper – leads to sticking.
- Adding cereal before chocolate is fully melted – results in uneven coating.
- Shaping too slowly – mixture firms quickly.
Precision and timing make the difference between average and exceptional nests.
Why This 10-Minute No-Bake Recipe Wins Every Time
We value recipes that deliver maximum impact with minimal effort. These nests require no baking skills, no complex equipment, and no advanced preparation. In just 10 minutes of active time, we create a holiday dessert that looks handcrafted and festive.
Their appeal lies in:
- Rich chocolate flavor
- Crunchy texture contrast
- Eye-catching presentation
- Effortless preparation
This combination makes them a repeat favorite year after year.
Nutritional Snapshot
While indulgent, portion control keeps them balanced. Each nest provides:
- Chocolate-based antioxidants
- Protein from peanut butter
- Crunchy satisfaction with modest serving size
For lighter options, we can use dark chocolate and reduce candy egg quantities.
Make-Ahead Advantage for Busy Hosts
Preparation flexibility sets this recipe apart. We can:
- Prepare nests 2–3 days in advance.
- Store chilled until needed.
- Transport easily without damage.
Their firm structure makes them ideal for event preparation without last-minute stress.
Elevating Presentation for a Professional Finish
For bakery-style results:
- Use a cookie scoop for uniform sizing.
- Smooth edges gently with a spoon.
- Arrange nests symmetrically on serving platters.
- Add edible glitter or pastel sprinkles for added elegance.
Small details transform simple treats into polished creations.
Frequently Asked Questions
Can we use milk chocolate instead?
Yes, but expect a sweeter flavor profile. Semi-sweet or dark chocolate provides better balance.
Do these nests require refrigeration?
Yes, chilling ensures they set firmly and maintain structure.
Can we make them vegan?
Use dairy-free chocolate chips and plant-based peanut butter to adapt the recipe.
How long do they take to set?
Typically 20–30 minutes in the refrigerator.
Conclusion: The Ultimate Easter Chocolate Crunch Treat
Choco-Crunch Easter Nests deliver maximum flavor, festive charm, and unbeatable convenience. Their no-bake simplicity makes them accessible to all skill levels, while their rich chocolate crunch ensures they disappear quickly from any dessert table.
With just a handful of ingredients and minimal effort, we create a visually stunning Easter dessert that combines texture, flavor, and holiday spirit in every bite. This is the kind of recipe we return to year after year—reliable, beautiful, and irresistibly delicious.