
Halloween Black Velvet Cookies with Orange Cream Filling
Dark, decadent chocolate cookies sandwiched with bright orange vanilla cream—spooky, sweet, and perfect for Halloween
Introduction: A Wickedly Delicious Halloween Treat
When Halloween rolls around, it’s time to get creative in the kitchen—and these Black Velvet Cookies with Orange Cream Filling are the ultimate spooky indulgence. With their rich chocolate flavor, dramatic black hue, and vibrant orange filling, they’re a showstopping treat that’s as delicious as it is festive.
These sandwich cookies are soft and cakey, like a cross between a whoopie pie and a brownie, with a creamy vanilla filling that’s tinted bright orange for a pop of Halloween flair. Whether you’re baking for a party, trick-or-treaters, or just a cozy night in with scary movies, these cookies are guaranteed to impress.
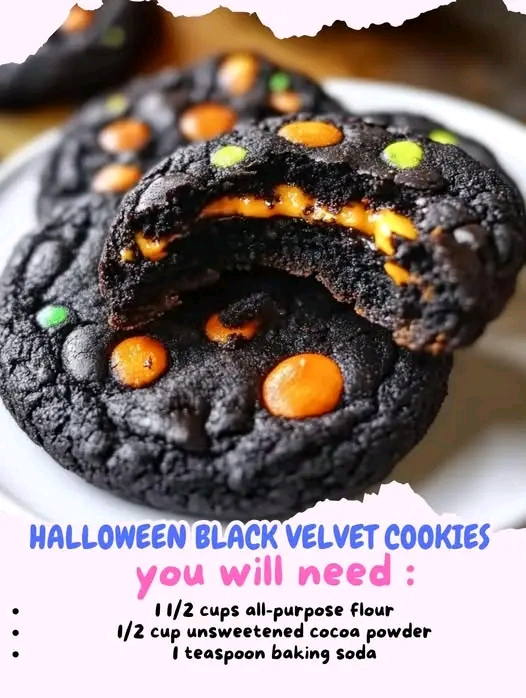
Ingredients Breakdown
Let’s take a closer look at what makes these cookies so hauntingly good:
For the Cookies:
- All-purpose flour (1½ cups)
Provides structure and a soft, cakey texture. - Unsweetened cocoa powder (½ cup)
Adds rich chocolate flavor and deep color. - Baking soda (1 tsp)
Helps the cookies rise and stay tender. - Salt (¼ tsp)
Balances sweetness and enhances flavor. - Unsalted butter (½ cup, softened)
Adds richness and helps create a tender crumb. - Granulated sugar (1 cup)
Sweetens and helps with spreading and texture. - Egg (1 large)
Binds the dough and adds moisture. - Vanilla extract (1 tsp)
Adds warmth and depth. - Black food coloring gel (1 tsp)
Creates the dramatic black velvet look. - Buttermilk (½ cup)
Adds moisture and a slight tang, making the cookies soft and fluffy.
Tip: Use gel food coloring for a more intense black without thinning the dough.
For the Orange Cream Filling:
- Unsalted butter (½ cup, softened)
Forms the creamy base of the filling. - Powdered sugar (1½ cups)
Sweetens and thickens the filling. - Heavy cream (2 tbsp)
Adds smoothness and helps achieve a spreadable consistency. - Vanilla extract (1 tsp)
Adds flavor and balances the sweetness. - Orange food coloring gel
Creates the festive Halloween hue.
Optional: Add orange zest or a drop of orange extract for a citrusy twist.
Equipment Needed
- Mixing bowls
- Hand mixer or stand mixer
- Measuring cups and spoons
- Baking sheets
- Parchment paper
- Cookie scoop or tablespoon
- Piping bag (optional)
Tip: Chill your piping bag for cleaner swirls of filling.
Step-by-Step Instructions
Step 1: Preheat and Prep
Preheat oven to 350°F (175°C).
Line baking sheets with parchment paper.
Tip: Use light-colored baking sheets to prevent over-browning.
Step 2: Mix the Dry Ingredients
In a medium bowl:
- Whisk together flour, cocoa powder, baking soda, and salt.
Set aside.
Step 3: Cream the Butter and Sugar
In a large mixing bowl:
- Beat softened butter and granulated sugar until light and fluffy (about 2–3 minutes).
Add egg, vanilla extract, and black food coloring.
Mix until smooth and evenly colored.
Step 4: Combine the Dough
Gradually add the dry ingredients to the wet mixture, alternating with buttermilk.
Mix until a thick, scoopable dough forms.
Tip: Don’t overmix—stop when just combined.
Step 5: Scoop and Bake
Scoop tablespoon-sized portions of dough onto prepared baking sheets.
Leave space between each cookie to allow for spreading.
Bake for 10–12 minutes, until:
- Cookies are set
- Centers are soft but not wet
Let cool on the baking sheet for 5 minutes, then transfer to a wire rack.
Step 6: Make the Orange Cream Filling
In a mixing bowl:
- Beat softened butter until creamy.
Gradually add powdered sugar, heavy cream, and vanilla extract.
Beat until light and fluffy.
Add orange food coloring and mix until desired shade is reached.
Optional: Chill for 10 minutes for easier piping.
Step 7: Assemble the Cookies
Once cookies are completely cool:
- Spread or pipe orange cream filling onto the flat side of one cookie.
Top with another cookie to create a sandwich.
Repeat with remaining cookies.
Presentation Tip: Roll the edges in Halloween sprinkles for extra flair.
Serving Suggestions
Perfect for:
- Halloween parties
- School treats
- Spooky movie nights
- Festive dessert platters
Pair with:
- Hot cocoa
- Pumpkin spice latte
- Chilled milk
- Apple cider
Yields:
- 12 sandwich cookies
Tip: Make a double batch—they disappear fast!
Variations to Try
Want to make them your own? Try these festive twists:
Mini Cookies
Use a teaspoon scoop for bite-sized versions.
Citrus Twist
Add orange zest or orange extract to the filling.
Double Chocolate
Add mini chocolate chips to the cookie dough.
Vegan Version
Use plant-based butter, dairy-free buttermilk, and egg substitute.
Witchy Colors
Swap orange filling for green or purple for a magical twist.
Storage and Make-Ahead Tips
- Make-Ahead: Bake cookies and store unfilled for up to 2 days. Fill before serving.
- Refrigerate: Store assembled cookies in an airtight container at room temp for up to 3 days.
- Freeze: Freeze unfilled cookies for up to 1 month. Thaw and fill as needed.
Tip: Store with parchment between layers to prevent sticking.
Nutrition Notes (Per Sandwich Cookie)
- Calories: ~210
- Protein: ~2g
- Carbohydrates: ~28g
- Fat: ~10g
- Sugar: ~18g
- Sodium: ~120mg
- Fiber: ~1g
These cookies are:
- Soft and cakey
- Rich and chocolatey
- Festive and fun
- Easy to make
Final Thoughts
These Halloween Black Velvet Cookies are more than just a treat—they’re a celebration of spooky season in every bite. Whether you’re baking with kids, hosting a party, or just getting into the Halloween spirit, they’re guaranteed to bring smiles (and maybe a few cackles).