
70s Hershey’s Chocolate Cake: A Retro Classic That Still Reigns Supreme
Moist, rich, and deeply chocolatey with a creamy cocoa frosting—this old-school cake is pure comfort
Introduction: A Slice of Sweet Nostalgia
Some recipes never fade with time—and this 1970s Hershey’s Chocolate Cake is one of them. It’s the kind of dessert that showed up at birthday parties, potlucks, and Sunday dinners, always greeted with excitement and devoured with joy. Moist, fluffy, and packed with cocoa flavor, it’s a true classic that still holds its own today.
This cake is simple to make, uses pantry staples, and delivers bakery-level results. The secret? Boiling water intensifies the cocoa, while buttermilk and oil keep the crumb tender and rich. Topped with a creamy chocolate frosting made with more Hershey’s cocoa, it’s a chocolate lover’s dream.
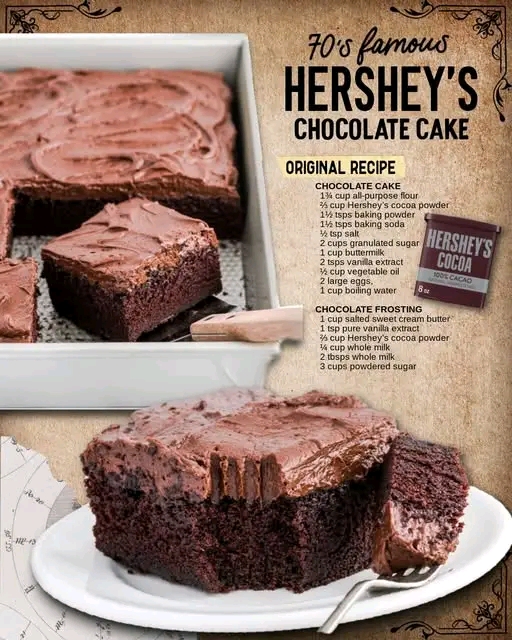
Ingredients Breakdown
Let’s take a closer look at what makes this cake so timelessly delicious:
For the Chocolate Cake:
- All-purpose flour (1¾ cups)
Provides structure and a soft crumb. - Unsweetened Hershey’s cocoa powder (⅔ cup)
Adds deep chocolate flavor—classic and nostalgic. - Baking powder (1½ tsp)
Helps the cake rise and stay fluffy. - Baking soda (1½ tsp)
Reacts with buttermilk for extra lift. - Salt (½ tsp)
Balances sweetness and enhances flavor. - Granulated sugar (2 cups)
Sweetens and helps with moisture retention. - Buttermilk (1 cup)
Adds tang and tenderness. - Pure vanilla extract (2 tsp)
Adds warmth and depth. - Vegetable oil (½ cup + 2 tbsp)
Keeps the cake moist and soft. - Eggs (2 large, room temperature)
Bind the batter and add richness. - Boiling water (1 cup)
Intensifies the cocoa flavor and helps dissolve it smoothly.
Tip: Use freshly boiled water and add it slowly to avoid curdling.
For the Chocolate Frosting:
- Salted sweet cream butter (1 cup, softened)
Adds richness and a smooth texture. - Pure vanilla extract (1 tsp)
Enhances the cocoa and adds depth. - Unsweetened Hershey’s cocoa powder (⅔ cup)
Keeps the frosting rich and chocolatey. - Whole milk (¼ cup + 2 tbsp)
Helps achieve a creamy, spreadable consistency. - Powdered sugar (3 cups)
Sweetens and thickens the frosting.
Optional: Add a pinch of salt or espresso powder for extra flavor.
Equipment Needed
- Mixing bowls
- Hand mixer or stand mixer
- Measuring cups and spoons
- Whisk and spatula
- 9×13-inch pan or two 9-inch round cake pans
- Saucepan or kettle for boiling water
Tip: Grease and flour your pans or use parchment for easy release.
Step-by-Step Instructions
Step 1: Preheat and Prep
Preheat oven to 350°F (175°C).
Grease and flour your cake pan(s) or line with parchment paper.
Tip: Use baking spray with flour for easy cleanup.
Step 2: Mix Dry Ingredients
In a large bowl:
- Whisk together flour, cocoa powder, baking powder, baking soda, and salt.
Set aside.
Step 3: Cream Wet Ingredients
In another bowl:
- Beat sugar, buttermilk, vanilla extract, and vegetable oil until smooth.
Add eggs one at a time, mixing well after each.
Step 4: Combine and Add Boiling Water
Gradually add dry ingredients to wet mixture.
Mix until just combined.
Slowly pour in boiling water, mixing on low speed until smooth.
Batter will be thin—this is normal.
Tip: Scrape down the sides to ensure even mixing.
Step 5: Bake
Pour batter into prepared pan(s).
Bake for 30–35 minutes (for 9×13) or 25–30 minutes (for rounds), until:
- A toothpick inserted in the center comes out clean
- The top springs back when lightly touched
Let cool in pan for 10 minutes, then transfer to a wire rack.
Step 6: Make the Frosting
In a mixing bowl:
- Beat softened butter until creamy.
Add cocoa powder and vanilla extract.
Gradually add powdered sugar and milk, alternating until smooth and fluffy.
Adjust consistency with more milk or sugar as needed.
Optional: Whip for 2–3 minutes for extra fluffiness.
Step 7: Frost and Serve
Once cake is completely cool:
- Spread frosting evenly over the top (and sides, if layered).
Decorate with sprinkles, chocolate shavings, or leave it classic.
Slice and serve!
Presentation Tip: Serve on a vintage cake stand for retro flair.
Serving Suggestions
Perfect for:
- Birthday parties
- Potlucks
- Family dinners
- Bake sales
Pair with:
- Cold milk
- Coffee or espresso
- Vanilla ice cream
- Fresh berries
Yields:
- 12–16 slices
Tip: Store covered at room temperature for up to 3 days or refrigerate for longer freshness.
Variations to Try
Want to make it your own? Try these delicious twists:
Chocolate Strawberry
Add sliced strawberries between layers.
Mocha
Add espresso powder to the frosting.
Coconut Chocolate
Top with shredded coconut.
Vegan Version
Use plant-based milk, oil, and egg substitute.
Cupcake Style
Bake in muffin tins for individual servings.
Storage and Make-Ahead Tips
- Make-Ahead: Bake cake layers up to 2 days in advance. Wrap and refrigerate.
- Refrigerate: Store frosted cake in airtight container for up to 5 days.
- Freeze: Freeze unfrosted cake for up to 2 months. Thaw and frost before serving.
Tip: Slice and wrap individual pieces for grab-and-go treats.
Nutrition Notes (Per Slice, ~1 of 16)
- Calories: ~350
- Protein: ~4g
- Carbohydrates: ~42g
- Fat: ~18g
- Sugar: ~30g
- Sodium: ~220mg
- Fiber: ~2g
This cake is:
- Rich and moist
- Easy to make
- Nostalgic and comforting
- Perfect for chocolate lovers
Final Thoughts
This 70s Hershey’s Chocolate Cake is more than just dessert—it’s a delicious slice of history. Whether you’re baking it for a celebration or just because, it’s guaranteed to bring smiles and satisfy every chocolate craving.