
The Ultimate Layered Dessert Experience
Introduction to the Ultimate No-Bake Cheesecake Delight
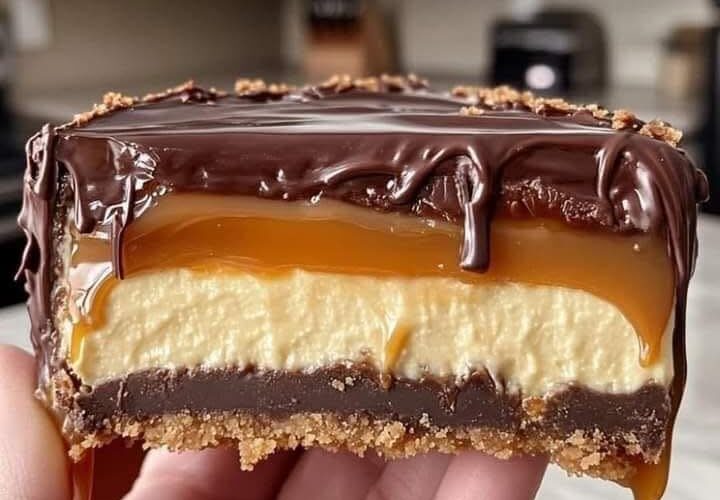
We present a luxurious Homemade No-Bake Twix Cheesecake that delivers everything dessert lovers crave: a buttery biscuit crust, a rich chocolate ganache, a silky cheesecake filling, and a decadent caramel finish inspired by the iconic Twix flavor combination. This recipe is designed for those who want a show-stopping dessert without turning on the oven, making it ideal for gatherings, celebrations, or indulgent weekends.
This no-bake cheesecake is meticulously layered to create a visually stunning dessert while offering perfect texture contrast in every bite. The crunch of the base, the snap of chocolate, the creaminess of the filling, and the smooth caramel drizzle combine into a dessert that feels gourmet yet approachable.
Why This Homemade No-Bake Twix Cheesecake Stands Out
This cheesecake is crafted to deliver maximum flavor with minimal effort. Unlike baked cheesecakes that require precise temperatures and long baking times, this recipe relies on chilling to set, ensuring a fail-proof result every time.
Key highlights include:
- No oven required
- Twix-inspired chocolate and caramel layers
- Clean slices with defined layers
- Perfect balance of sweetness and richness
- Make-ahead friendly for stress-free entertaining
Ingredients for Homemade No-Bake Twix Cheesecake
Each ingredient plays a precise role in achieving the ideal structure and flavor. Quality ingredients ensure a superior final result.
For the Crust
- 2 cups graham cracker crumbs
- 1/2 cup melted butter
For the Chocolate Layer
- 1 cup chocolate chips
- 1/2 cup heavy cream
For the Cheesecake Filling
- 2 cups cream cheese, softened
- 1/2 cup powdered sugar
- 1 teaspoon vanilla extract
- 1 cup whipped cream
For the Caramel and Topping
- 1 cup caramel sauce
- Additional melted chocolate for drizzle (optional)
Step-by-Step Preparation for Perfect Results
Make the Buttery Graham Cracker Crust
We begin by combining graham cracker crumbs with melted butter until the texture resembles wet sand. This mixture is firmly pressed into the bottom of a springform pan to form a sturdy base. Chilling the crust for 10 minutes allows it to set, ensuring it holds together when sliced.
This foundation delivers a subtle sweetness and crunch, mimicking the biscuit layer found in classic Twix bars.
Prepare the Rich Chocolate Ganache Layer
Chocolate chips and heavy cream are gently melted together in short microwave intervals until smooth and glossy. This ganache is poured evenly over the chilled crust, creating a firm chocolate barrier that adds depth and structure.
Refrigerating this layer for 15–20 minutes ensures it sets properly before the cheesecake filling is added, preventing layer mixing.
Create the Creamy Cheesecake Filling
Softened cream cheese is beaten with powdered sugar and vanilla extract until completely smooth. Folding in whipped cream introduces air, resulting in a light, mousse-like texture that contrasts beautifully with the dense chocolate layer below.
This filling delivers classic cheesecake flavor without heaviness, making it ideal for a no-bake dessert.
Assemble the Cheesecake Layers
The cheesecake filling is spooned over the set chocolate layer and smoothed evenly. A generous layer of caramel sauce is poured on top, echoing the signature Twix flavor profile.
For added indulgence, a final drizzle of melted chocolate can be poured over the caramel, allowing it to cascade naturally down the sides for a dramatic presentation.
Chill, Set, and Serve
The assembled cheesecake is refrigerated for at least four hours, allowing all layers to fully set and meld together. Once chilled, the cheesecake slices cleanly, revealing its distinct layers.
Professional Tips for Flawless Cheesecake Slices
- Warm your knife with hot water before slicing to achieve clean, professional cuts
- Wipe the knife between each slice to maintain sharp edges
- Allow the cheesecake to sit at room temperature for 5 minutes before serving for optimal texture
Serving Suggestions and Presentation Ideas
This Homemade No-Bake Twix Cheesecake pairs beautifully with:
- Fresh berries for a hint of acidity
- Extra caramel drizzle for added indulgence
- Chocolate shavings or Twix-style biscuit crumbs for texture
Serve on chilled dessert plates to preserve structure and enhance visual appeal.
Storage and Make-Ahead Instructions
This cheesecake stores exceptionally well, making it ideal for advance preparation.
- Refrigerator: Store covered for up to 4 days
- Freezer: Freeze individual slices for up to 1 month; thaw overnight in the refrigerator
Nutritional Overview
- Prep Time: 20 minutes
- Chill Time: 4 hours
- Total Time: 4 hours 20 minutes
- Servings: 8–10
- Calories: Approximately 450 per serving
This dessert offers a rich indulgence, perfect for special occasions.
Why This Recipe Is a Must-Try Dessert
This Homemade No-Bake Twix Cheesecake combines ease, elegance, and indulgence in one unforgettable dessert. It satisfies chocolate lovers, caramel enthusiasts, and cheesecake purists alike, all while requiring no baking expertise.
The carefully layered structure ensures every bite delivers balanced sweetness, creamy texture, and satisfying crunch, making it a standout centerpiece for any dessert table.
Final Thoughts on Homemade No-Bake Twix Cheesecake
We believe this recipe defines what a modern no-bake dessert should be: visually striking, flavor-forward, and effortlessly achievable. Whether served at a celebration or enjoyed as a personal treat, this cheesecake consistently impresses.
By following these detailed steps and tips, we ensure a dessert that looks professional, tastes exceptional, and earns its place among the most sought-after no-bake cheesecake recipes.