
The Ultimate Sweet Breakfast Indulgence
When we combine the irresistible sweetness of King’s Hawaiian rolls with a luscious no-bake cheesecake filling, the result is a bakery-style masterpiece that looks impressive yet requires minimal effort. Our King’s Hawaiian Cheesecake Danish delivers a rich, buttery base layered with warm cinnamon sugar and finished with silky vanilla glaze. This is the kind of dessert that commands attention at brunch tables, holiday gatherings, and family celebrations.
Below, we provide a complete, detailed guide to crafting the perfect batch—ensuring every roll is caramelized, creamy, and beautifully glazed.
Why King’s Hawaiian Cheesecake Danish Is So Popular
The magic of this recipe lies in three essential elements:
- Soft, slightly sweet Hawaiian rolls
- Creamy cheesecake filling
- Buttery cinnamon caramelization
King’s Hawaiian rolls are known for their pillowy texture and subtle sweetness. When baked with butter and cinnamon sugar, they transform into a golden, lightly crisp exterior while maintaining a tender interior. Once filled with cheesecake and topped with glaze, they become an irresistible fusion of Danish pastry and cheesecake dessert.
This recipe stands out because it is:
- Quick to prepare
- Perfect for sharing
- Elegant yet simple
- Ideal for holidays and brunch spreads
Ingredients for King’s Hawaiian Cheesecake Danish
For the Danish Base
- 1 package (12 count) Hawaiian rolls
- ½ cup salted butter, melted and divided
- 2 tablespoons light brown sugar
- ½ teaspoon ground cinnamon
For the Cheesecake Filling
- ½ tub (12 ounces) prepared no-bake cheesecake filling
For the Vanilla Glaze
- 1 cup powdered sugar
- 2 tablespoons milk
- ½ teaspoon vanilla extract
Each ingredient plays a precise role in texture, sweetness, and structure. Using high-quality butter and pure vanilla extract significantly enhances the flavor profile.
Step-by-Step Guide to Perfect Cheesecake Danish Rolls
1. Preheat and Prepare the Baking Dish
We begin by preheating the oven to 375°F (190°C). Proper preheating ensures even caramelization from the start.
Brush approximately 2 tablespoons of melted butter across the bottom and sides of a 9×13-inch baking dish. This prevents sticking and creates a buttery foundation that crisps beautifully during baking.
2. Prepare the Hawaiian Rolls Without Separating
Place the entire connected sheet of Hawaiian rolls into the buttered dish without pulling them apart. Keeping them intact allows the rolls to bake evenly and maintain structure.
Using a small sharp knife, carefully cut a shallow well into the center of each roll. Remove a small circular portion from the top, cutting about halfway down. These wells will cradle the cheesecake filling later.
The removed bread pieces can be saved for:
- Bread pudding
- French toast bites
- Snacking
3. Create the Cinnamon Sugar Butter Coating
In a small bowl, mix:
- Remaining melted butter
- Brown sugar
- Ground cinnamon
Stir until the sugar begins dissolving into the butter.
Using a pastry brush, generously coat:
- The tops of each roll
- The inside of each carved well
This step ensures every bite carries a warm, caramelized cinnamon flavor.
4. Bake Until Golden and Caramelized
Place the dish into the preheated oven and bake for 10 minutes.
During baking:
- Butter bubbles around the rolls
- Brown sugar caramelizes
- The tops develop a golden sheen
Once removed from the oven, allow the rolls to cool for 10–15 minutes. The surface must be cool to the touch before adding the cheesecake filling to prevent melting.
Preparing the Smooth Vanilla Glaze
While the rolls cool, we prepare the glaze.
In a small bowl, whisk together:
- Powdered sugar
- Milk
- Vanilla extract
The consistency should be thick but pourable. If it’s too thick, add a few drops of milk. If too thin, incorporate additional powdered sugar.
The glaze provides:
- Balanced sweetness
- A glossy finish
- Professional bakery appearance
Filling the Cheesecake Danish Rolls
Once the rolls are completely cooled:
Scoop approximately 1 to 1½ tablespoons of no-bake cheesecake filling into each well. A small cookie scoop ensures uniform portions and a clean finish.
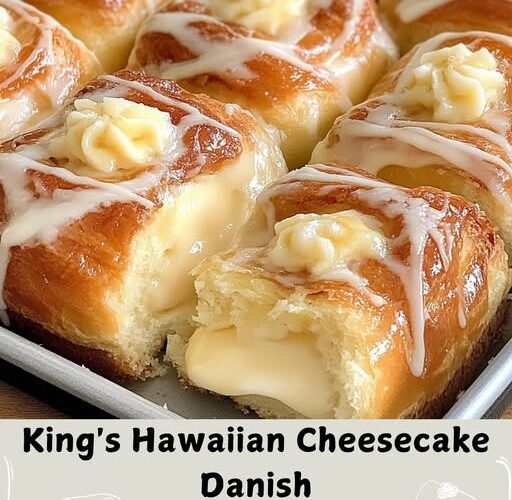
The cheesecake filling should sit slightly above the surface, creating a rich center that contrasts with the golden exterior.
Final Glaze and Presentation
Drizzle the vanilla glaze generously over the filled danishes using:
- A spoon for rustic charm
- A zip-top bag with a snipped corner for precision
Serve immediately for the best texture, or refrigerate until ready to serve.
The final product features:
- Buttery cinnamon base
- Creamy cheesecake center
- Sweet vanilla glaze finish
Expert Tips for the Best Cheesecake Danish
Use Room Temperature Cheesecake Filling
Cold filling can be stiff and difficult to portion smoothly.
Do Not Overbake
Overbaking dries out the rolls and hardens the base.
Allow Complete Cooling Before Filling
Heat will melt the cheesecake filling, affecting structure.
Enhance with Optional Toppings
We recommend:
- Fresh strawberries
- Blueberries
- Lemon zest
- Toasted coconut
- Caramel drizzle
Storage and Make-Ahead Instructions
Refrigeration
Store leftovers in an airtight container for up to 3 days.
Serving After Refrigeration
Allow to sit at room temperature for 15–20 minutes before serving for optimal softness.
Make Ahead Option
Bake the rolls and prepare glaze one day in advance. Fill and drizzle shortly before serving.
Flavor Variations to Elevate Your Danish
Strawberry Cheesecake Danish
Top the cheesecake filling with sliced strawberries before glazing.
Blueberry Lemon Danish
Add fresh blueberries and a sprinkle of lemon zest.
Chocolate Cheesecake Danish
Mix mini chocolate chips into the cheesecake filling.
Caramel Pecan Danish
Drizzle caramel sauce and sprinkle toasted pecans over the glaze.
Each variation transforms the base into a new gourmet experience.
Why This Recipe Works Perfectly Every Time
This recipe succeeds because it balances:
- Sweetness from Hawaiian rolls
- Richness from butter
- Creaminess from cheesecake
- Warm spice from cinnamon
- Smooth finish from vanilla glaze
The structure remains soft yet sturdy, while the filling provides luxurious contrast. It is approachable for beginners yet refined enough for entertaining.
Perfect Occasions for King’s Hawaiian Cheesecake Danish
This dessert shines at:
- Holiday brunches
- Baby showers
- Easter gatherings
- Mother’s Day breakfast
- Potlucks
- Weekend family brunch
Its visual appeal and indulgent flavor make it a guaranteed crowd-pleaser.
Nutritional Considerations
While this recipe is indulgent, portion control makes it manageable. Each roll offers a satisfying balance of carbohydrates, dairy richness, and sweetness—perfect as a special treat.
For lighter adjustments:
- Use reduced-fat cheesecake filling
- Decrease glaze quantity
- Replace half the butter with unsalted and reduce sugar slightly
Conclusion: The Ultimate Bakery-Style Cheesecake Danish at Home
Our King’s Hawaiian Cheesecake Danish transforms simple ingredients into a stunning dessert that rivals professional bakeries. With buttery cinnamon caramelization, creamy cheesecake centers, and elegant glaze drizzle, every bite delivers warmth and richness.
This recipe is reliable, adaptable, and visually striking—making it an essential addition to any dessert collection.